Building Argus SOC | Phase 0 Part 1 | Prerequisites, Hardware Setup and Encrypted Tunnel
Phase 0 Part 1 of the Argus SOC build — external accounts, Pi 5 and Pi 3B+ base configuration, Cisco SG300 SPAN port setup, Pi-hole DNS, and the WireGuard encrypted tunnel.

📌 Author’s note — This post documents the Argus SOC lab at the time of publication, when the Pi 3B+ served as the MSSP edge sensor and the Pi 5 hosted the vulnerable Docker targets. The architecture was redesigned in Phase 5, which introduced a ThinkCentre M920x running Proxmox with an Active Directory lab as the client infrastructure, and moved the edge-sensor role onto the Pi 5. The detection logic, custom rules, and gap analysis described here remain valid; only the host topology has changed.
Build carried out on real hardware in a controlled home lab. Claude (Anthropic) was used as a reasoning and writing assistant — all deployments, attacks, configurations, and verifications were performed by the author.
Overview
This is the first hands-on post in the Argus SOC build series. Before any security tooling gets installed, the foundation needs to be solid — external accounts, hardened operating systems on both Raspberry Pis, SPAN port mirroring on the managed switch, DNS filtering, and an encrypted management tunnel between nodes.
By the end of Phase 0 - Part 1, both Pis are online and hardened, the Cisco SG300 is mirroring all network traffic to the edge sensor, Pi-hole is filtering DNS for the entire network, and both nodes are communicating over WireGuard.
The full project architecture is documented in the Argus SOC repository.
Architecture
1
2
3
4
5
6
7
8
9
10
192.168.1.0/24 — Single flat subnet

Pi 5 (argus-central)     192.168.1.10
Pi 3B+ (argus-edge-01)   192.168.1.20
Cisco SG300-10MP         192.168.1.2
Router                   192.168.1.1

WireGuard overlay (management):
Pi 5   → 10.0.0.1
Pi 3B+ → 10.0.0.2
Everything sits on a single flat 192.168.1.0/24 subnet. The Cisco SG300 managed switch provides SPAN port mirroring — GE1 + GE5 + GE10 → GE2 — giving Suricata on the Pi 3B+ full visibility of all traffic on the network.
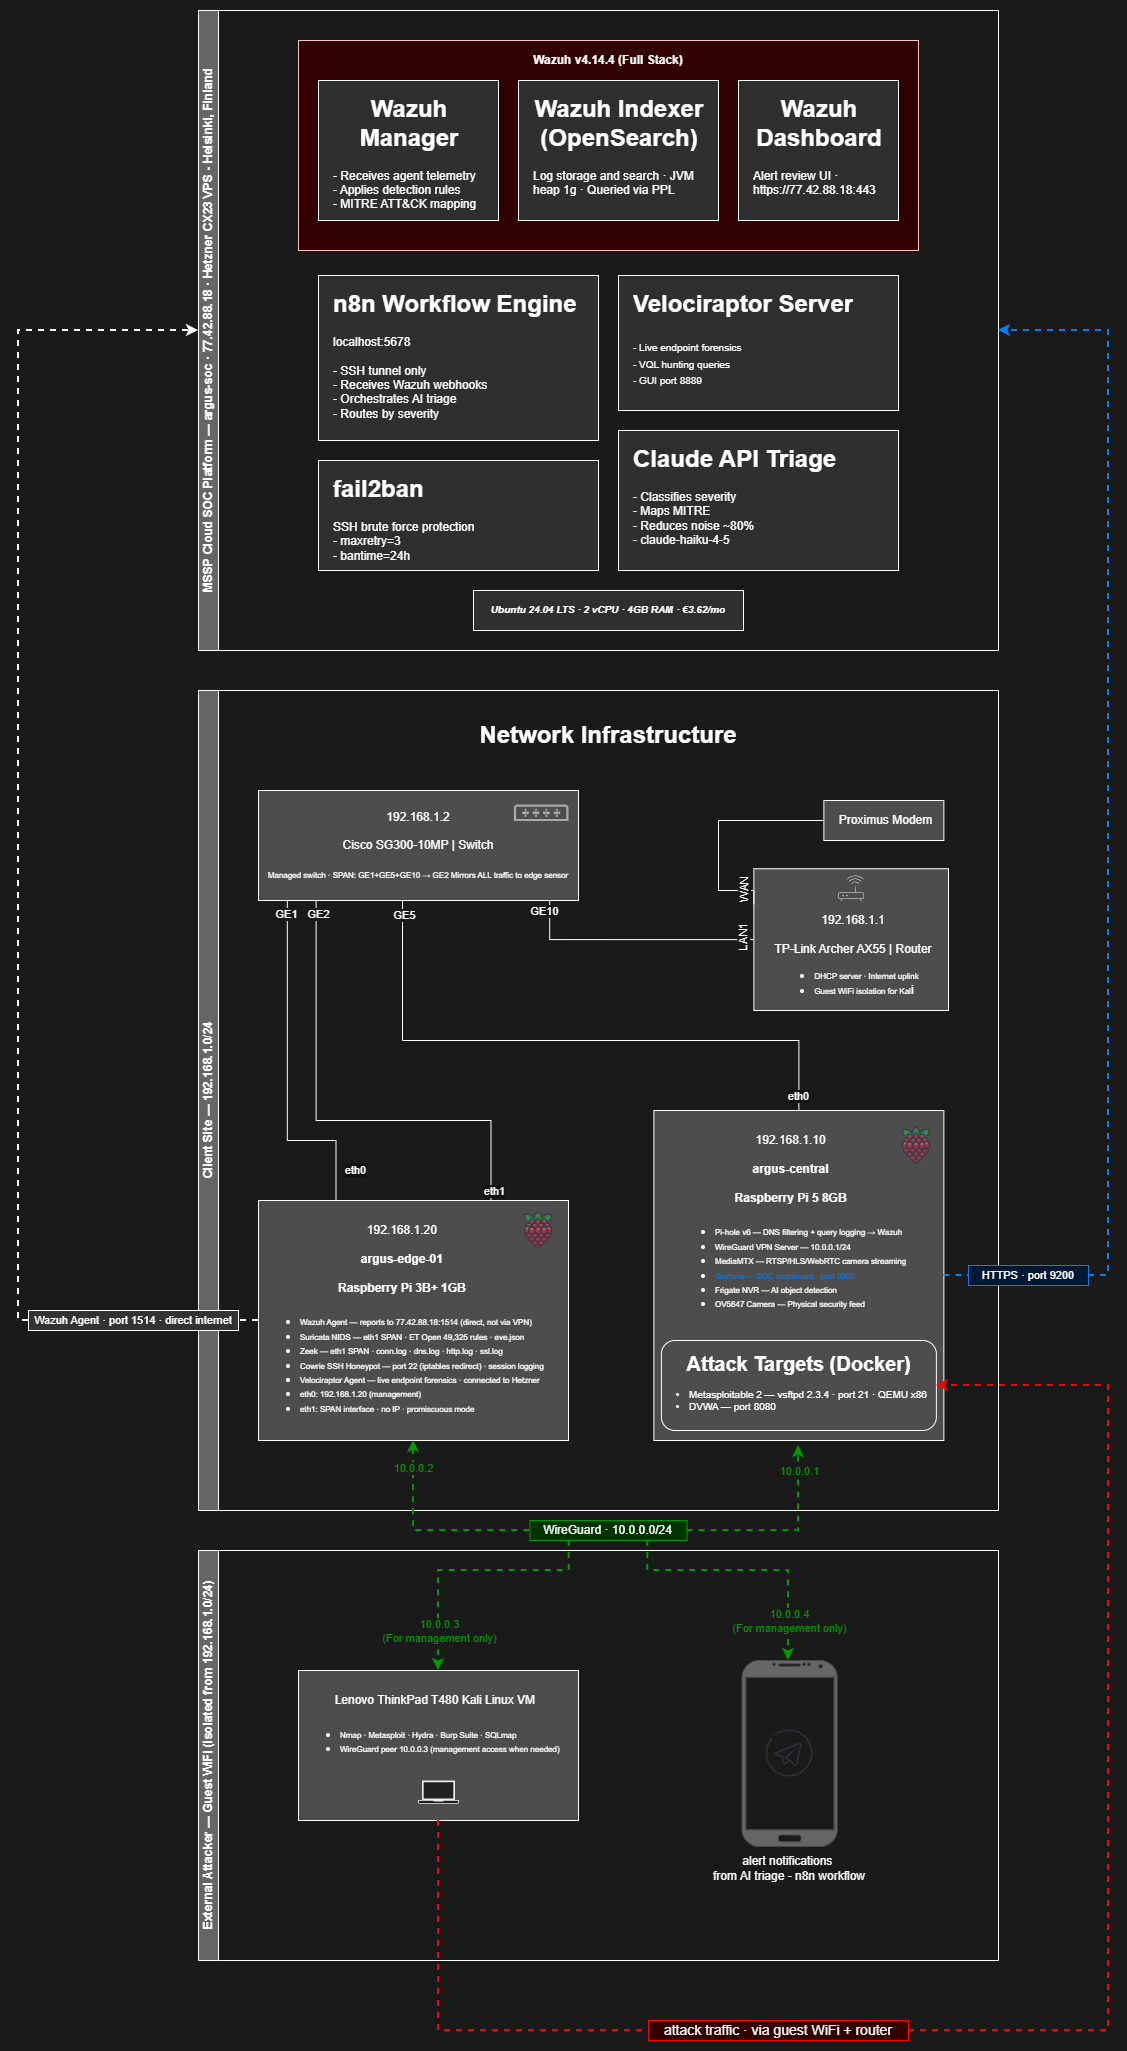 Argus SOC — Three-tier MSSP topology. Click to enlarge.
Prerequisites — External Accounts
Before touching any hardware, four external accounts need to exist. These are dependencies for the cloud SOC platform and the AI triage pipeline built in later phases.
Anthropic API
Created at console.anthropic.com. This provides the Claude API key used by the n8n workflow engine in Phase 1 to classify every Wazuh alert in real time — assigning severity, mapping to MITRE ATT&CK, and generating plain-English summaries.
A small credit balance (€5–10) is enough to cover Phase 1 testing.
Telegram Bot
Created via @BotFather in Telegram. This is the operator notification channel — every medium and critical alert fires a formatted Telegram message.
1
2
3
4
5
6
# 1. Open Telegram → search @BotFather → send /newbot
# 2. Name the bot: "Argus SOC Alerts"
# 3. Save the bot token

# 4. Send any message to your bot, then retrieve your chat ID:
curl -s "https://api.telegram.org/bot<TOKEN>/getUpdates" | jq '.result[0].message.chat.id'
Save both the token and chat ID — they go into n8n in Phase 1.
PagerDuty
Signed up for the free tier at pagerduty.com. Key notes:
- PagerDuty prefers business email during signup — a ProtonMail alias worked as a workaround
- The account was provisioned on the EU instance — this matters in Phase 1, the n8n webhook must point to the EU endpoint:
1
https://events.eu.pagerduty.com/v2/enqueue
- Created a service named Argus SOC Critical Alerts with an Events API v2 integration. The integration key was saved securely.
Hetzner
Account created at hetzner.com with payment method configured. The CX23 VPS gets deployed in Step 0.7 (Phase 0 Part 2) — the account just needs to be ready.
Step 0.1 — Pi 5 Base Configuration
Network Addressing
The home network was running on 192.168.0.x by default. Rather than adapt IP addresses throughout the entire build, the router’s LAN subnet was reconfigured to match the project spec (192.168.1.0/24):
- Router LAN IP →
192.168.1.1 - DHCP pool →
192.168.1.2 – 192.168.1.199 - Pi 5 MAC address reserved to
192.168.1.10 - Pi 3B+ MAC address reserved to
192.168.1.20
The Pi 5 also had a legacy static IP hardcoded in /etc/dhcpcd.conf from a previous configuration that was overriding NetworkManager and causing the old 192.168.0.50 address to persist after reboot:
1
2
3
4
5
6
sudo nano /etc/dhcpcd.conf
# Updated:
# static ip_address=192.168.1.10/24
# static routers=192.168.1.1
# static domain_name_servers=1.1.1.1 8.8.8.8
sudo reboot
After reboot, ip addr show eth0 confirmed a single clean address: 192.168.1.10/24.
OS Flash
Flashed Raspberry Pi OS Lite (64-bit, Debian 12 Bookworm) via Raspberry Pi Imager. In Advanced Options: SSH enabled, hostname argus-central, strong password set.
Hostname and Packages
1
2
3
4
5
sudo hostnamectl set-hostname argus-central

sudo apt update && sudo apt full-upgrade -y
sudo apt install -y git curl wget htop tmux ufw net-tools jq \
  python3-pip python3-venv dnsutils lsof fail2ban unattended-upgrades
Static IP
1
2
3
4
5
sudo nmcli con mod 'Wired connection 1' ipv4.addresses 192.168.1.10/24
sudo nmcli con mod 'Wired connection 1' ipv4.gateway 192.168.1.1
sudo nmcli con mod 'Wired connection 1' ipv4.dns '1.1.1.1,8.8.8.8'
sudo nmcli con mod 'Wired connection 1' ipv4.method manual
sudo nmcli con up 'Wired connection 1'
SSH Hardening
ssh-copy-id is not available on Windows, so the public key was copied manually.
On the ThinkPad (PowerShell):
1
2
ssh-keygen   # generates a key pair if you don't have one
# Copy the contents of the .pub file in C:\Users\<you>\.ssh\
On the Pi:
1
2
3
mkdir -p ~/.ssh
echo "PASTE_YOUR_PUBLIC_KEY_HERE" >> ~/.ssh/authorized_keys
chmod 700 ~/.ssh && chmod 600 ~/.ssh/authorized_keys
Verified passwordless login from a new terminal session before disabling password authentication:
1
2
3
4
5
sudo sed -i 's/#PasswordAuthentication yes/PasswordAuthentication no/' /etc/ssh/sshd_config
sudo sed -i 's/PasswordAuthentication yes/PasswordAuthentication no/' /etc/ssh/sshd_config
sudo sed -i 's/#Port 22/Port 2222/' /etc/ssh/sshd_config
sudo systemctl restart sshd
# Reconnect: ssh -p 2222 <user>@192.168.1.10
Firewall
1
2
3
4
5
6
7
8
9
sudo ufw default deny incoming
sudo ufw default allow outgoing
sudo ufw allow 2222/tcp comment 'SSH'
sudo ufw allow 51820/udp comment 'WireGuard'
sudo ufw allow from 10.0.0.0/24 comment 'WireGuard subnet'
sudo ufw allow 53 comment 'DNS Pi-hole'
sudo ufw allow 80/tcp comment 'Pi-hole admin'
sudo ufw allow from 192.168.1.0/24 to any port 3000 comment 'Grafana'
sudo ufw enable
Step 0.2 — Router DHCP Configuration
In the router web UI (TP-Link Archer AX55):
- DHCP pool:
192.168.1.2 – 192.168.1.199 - Reserve
192.168.1.10for Pi 5 (MAC binding) - Reserve
192.168.1.20for Pi 3B+ (MAC binding) - Reserve
192.168.1.2for Cisco SG300 (MAC binding) - Primary DNS:
192.168.1.10(Pi-hole — set after Step 0.5) - Guest WiFi: isolation enabled (for Kali on ThinkPad)
Step 0.3 — Cisco SG300-10MP SPAN Port
Accessing the Switch
The SG300 picks up a DHCP address on first boot. Navigate to the assigned IP in a browser. Default credentials: username cisco, password cisco — change immediately.
A static reservation was set in the router for the switch MAC address. The switch management IP is 192.168.1.2 on the Main VLAN, reachable from the ThinkPad and Pi 5 without any additional configuration.
SPAN Port Mirroring
On the SG300, port mirroring lives under Administration → Diagnostics → Port and VLAN Mirroring — not under Port Management where you might expect it.
Click Add and create one entry per source port:
| Destination Port | Source Interface | Type |
|---|---|---|
| GE2 | GE1 | Tx and Rx |
| GE2 | GE5 | Tx and Rx |
| GE2 | GE10 | Tx and Rx |
GE2 receives a copy of all traffic from GE1, GE5, and GE10. Each source must be added as a separate entry.
Port assignment:
| Port | Connection | Purpose |
|---|---|---|
| GE1 | Pi 3B+ eth0 (built-in NIC) | Edge sensor main connectivity — SPAN source |
| GE2 | Pi 3B+ eth1 (USB adapter) | SPAN mirror destination — no IP, promiscuous |
| GE5 | Pi 5 (argus-central) | Client infrastructure — SPAN source |
| GE10 | Router LAN port | Internet uplink — SPAN source |
⚠️ GE2 is now a mirror-only port. Never assign it an IP address or route management traffic through it.
Disable STP
The SG300 runs Spanning Tree Protocol by default, which generates constant STP frames in tcpdump output. Disable it under Spanning Tree → STP Status & Global Settings, uncheck Enable STP, click Apply.
Save Configuration
Navigate to Administration → File Management → Copy/Save Configuration:
- Source: Running configuration
- Destination: Startup configuration
Without this step, all configuration is lost on reboot.
Step 0.4 — Pi 3B+ Base Configuration
Hardware Health Check
The Pi 3B+ arrived second hand. Quick check before touching software:
1
2
3
vcgencmd measure_temp  # 42.9°C at idle — normal
free -h                # 906MB RAM, 749MB available — fits requirements
df -h                  # 117GB SD card, 2.8GB used — plenty of space
OS Flash
Flashed Raspberry Pi OS Lite (64-bit) via Raspberry Pi Imager. Hostname: argus-edge-01. SSH enabled. Connect built-in ethernet to GE1, USB ethernet adapter to GE2. Power on.
Static IP and Packages
1
2
3
4
5
6
7
8
sudo nmcli con mod 'Wired connection 1' ipv4.addresses 192.168.1.20/24
sudo nmcli con mod 'Wired connection 1' ipv4.gateway 192.168.1.1
sudo nmcli con mod 'Wired connection 1' ipv4.dns 192.168.1.10
sudo nmcli con mod 'Wired connection 1' ipv4.method manual
sudo nmcli con up 'Wired connection 1'

sudo apt update && sudo apt full-upgrade -y
sudo apt install -y git curl wget htop tmux ufw net-tools jq python3-pip python3-venv
SPAN Interface (eth1)
The USB ethernet adapter is the SPAN monitoring interface — no IP, promiscuous mode only.
USB adapter detection issue: The bottom USB ports on the Pi 3B+ failed to enumerate the adapter with error -32: device not accepting address. Moving to a top USB port resolved it immediately. Try all four ports before concluding the adapter is faulty.
1
2
3
4
5
6
7
8
9
10
11
12
13
14
# Identify the USB adapter
ip link show
# Look for eth1 or enx<mac> — this is the USB adapter

# Set promiscuous mode
sudo ip link set eth1 promisc on
sudo ip link set eth1 up

# Make persistent via NetworkManager
sudo nmcli con add type ethernet con-name span-monitor ifname eth1
sudo nmcli con mod span-monitor ipv4.method disabled
sudo nmcli con mod span-monitor ipv6.method disabled
sudo nmcli con mod span-monitor 802-3-ethernet.accept-all-mac-addresses true
sudo nmcli con up span-monitor
Verify:
1
2
3
ip link show eth1
# Must show PROMISC flag:
# eth1: <BROADCAST,MULTICAST,PROMISC,UP,LOWER_UP>
SSH Hardening
Same process as Pi 5 — public key copied manually:
1
2
3
mkdir -p ~/.ssh
echo "PASTE_YOUR_PUBLIC_KEY_HERE" >> ~/.ssh/authorized_keys
chmod 700 ~/.ssh && chmod 600 ~/.ssh/authorized_keys
1
2
3
sudo sed -i 's/#PasswordAuthentication yes/PasswordAuthentication no/' /etc/ssh/sshd_config
sudo sed -i 's/PasswordAuthentication yes/PasswordAuthentication no/' /etc/ssh/sshd_config
sudo systemctl restart sshd
Firewall
1
2
3
4
5
6
sudo ufw default deny incoming
sudo ufw default allow outgoing
sudo ufw allow 22/tcp comment 'SSH (Cowrie takes this port in Phase 2)'
sudo ufw allow from 10.0.0.0/24 comment 'WireGuard subnet'
sudo ufw allow from 192.168.1.0/24 comment 'LAN management always allowed'
sudo ufw enable
Step 0.5 — Pi-hole v6 on Pi 5
Pi-hole serves as the DNS resolver and filter for the entire network. Every query is logged and forwarded to Wazuh as telemetry — suspicious DNS lookups become additional detection signals.
1
2
3
4
5
6
7
8
# On Pi 5:
curl -sSL https://install.pi-hole.net | bash
# Installer: select eth0, static IP 192.168.1.10, upstream DNS: Cloudflare 1.1.1.1

# Set admin password
pihole -a -p

# Access admin UI: http://192.168.1.10/admin
Whitelist essential domains immediately — Pi-hole will block some of them by default:
1
sudo pihole allow api.anthropic.com api.telegram.org app.pagerduty.com events.eu.pagerduty.com packages.wazuh.com raw.githubusercontent.com github.com deb.nodesource.com
Update router DHCP to hand out 192.168.1.10 as the primary DNS server for all clients.
Step 0.6 — WireGuard VPN Tunnel
WireGuard provides an encrypted management overlay between both Pis. SSH, monitoring traffic, and inter-node communication all travel through 10.0.0.0/24.
Pi 5 — VPN Server
1
2
3
4
5
6
7
sudo apt install -y wireguard

wg genkey | sudo tee /etc/wireguard/pi5-private.key | wg pubkey | \
  sudo tee /etc/wireguard/pi5-public.key
sudo chmod 600 /etc/wireguard/pi5-private.key

sudo nano /etc/wireguard/wg0.conf
1
2
3
4
5
6
7
8
9
10
11
12
13
14
[Interface]
Address = 10.0.0.1/24
ListenPort = 51820
PrivateKey = <contents of pi5-private.key>
PostUp = iptables -A FORWARD -i wg0 -j ACCEPT; iptables -t nat -A POSTROUTING -o eth0 -j MASQUERADE
PostDown = iptables -D FORWARD -i wg0 -j ACCEPT; iptables -t nat -D POSTROUTING -o eth0 -j MASQUERADE

[Peer]  # Pi 3B+
PublicKey = <contents of pi3-public.key>
AllowedIPs = 10.0.0.2/32

[Peer]  # ThinkPad (optional)
PublicKey = <contents of thinkpad-public.key>
AllowedIPs = 10.0.0.3/32
1
2
sudo systemctl enable wg-quick@wg0
sudo systemctl start wg-quick@wg0
Pi 3B+ — VPN Peer
1
2
3
4
5
6
7
sudo apt install -y wireguard

wg genkey | sudo tee /etc/wireguard/pi3-private.key | wg pubkey | \
  sudo tee /etc/wireguard/pi3-public.key
sudo chmod 600 /etc/wireguard/pi3-private.key

sudo nano /etc/wireguard/wg0.conf
1
2
3
4
5
6
7
8
9
[Interface]
Address = 10.0.0.2/24
PrivateKey = <contents of pi3-private.key>

[Peer]
PublicKey = <contents of pi5-public.key>
Endpoint = 192.168.1.10:51820
AllowedIPs = 10.0.0.0/24
PersistentKeepalive = 25
1
2
sudo systemctl enable wg-quick@wg0
sudo systemctl start wg-quick@wg0
Troubleshooting — SSH Disconnection on WireGuard Start
Starting WireGuard on the Pi 3B+ caused an immediate SSH disconnection and made the device completely unreachable — required physical console access to recover.
Root cause: The initial AllowedIPs included 192.168.1.0/24, which routed all network traffic through the tunnel — including the active SSH session. The moment the tunnel started, SSH died instantly.
1
2
3
4
5
# Wrong — kills your SSH session
AllowedIPs = 10.0.0.0/24, 192.168.1.0/24

# Correct — only route the WireGuard management subnet
AllowedIPs = 10.0.0.0/24
Lesson learned: When configuring WireGuard remotely, never include your management subnet in
AllowedIPsunless you have physical console access as a fallback.
Verification
1
2
3
4
5
6
7
8
9
10
# From Pi 3B+:
ping -c 3 10.0.0.1
# 3 packets transmitted, 3 received, 0% packet loss

# From Pi 5:
ping -c 3 10.0.0.2
# 3 packets transmitted, 3 received, 0% packet loss

# Show handshake on either node:
sudo wg show
Both nodes confirmed with sub-1ms latency and persistent keepalive active.
Current State
| Component | Status |
|---|---|
Pi 5 — hostname argus-central | ✅ |
Pi 5 — static IP 192.168.1.10 | ✅ |
| Pi 5 — SSH port 2222, key-only | ✅ |
| Pi 5 — UFW firewall | ✅ |
| Pi 5 — Pi-hole DNS | ✅ |
Pi 5 — WireGuard 10.0.0.1 | ✅ |
Pi 3B+ — hostname argus-edge-01 | ✅ |
Pi 3B+ — static IP 192.168.1.20 | ✅ |
| Pi 3B+ — SSH key-only | ✅ |
| Pi 3B+ — UFW firewall | ✅ |
| Pi 3B+ — eth1 PROMISC (SPAN interface) | ✅ |
Pi 3B+ — WireGuard 10.0.0.2 | ✅ |
| Cisco SG300 — SPAN GE1+GE5+GE10 → GE2 | ✅ |
| WireGuard tunnel | ✅ Verified both directions |
| Anthropic API | ✅ Account + key ready |
| Telegram Bot | ✅ Token + chat ID saved |
| PagerDuty | ✅ EU instance, integration key ready |
| Hetzner | ✅ Account ready |
What’s Next — Phase 0 Part 2
With both nodes hardened, connected, and the SPAN interface ready, Phase 0 Part 2 covers the SOC platform and detection stack:
- Step 0.7 — Deploy Hetzner VPS + full Wazuh stack (Manager + Indexer + Dashboard)
- Step 0.8 — Wazuh Agent on Pi 3B+, reporting to Hetzner
- Step 0.9 — Suricata NIDS on Pi 3B+ (SPAN interface)
- Step 0.10 — Zeek protocol analysis on Pi 3B+
- Step 0.11 — SPAN + Suricata + Zeek verification
- Step 0.12 — Attack targets on Pi 5 (Metasploitable 2, DVWA)
- Phase 0 verification checkpoint
Part of the Argus SOC build series.