Building Argus SOC | Phase 2 | Cowrie SSH Honeypot
Phase 2 of the Argus SOC build — deploying Cowrie SSH honeypot on the Pi 3B+. Port 22 becomes a trap. Every credential brute-forced, every command typed, every file an attacker tries to download is logged and forwarded to Wazuh.

📌 Author’s note — This post documents the Argus SOC lab at the time of publication, when the Pi 3B+ served as the MSSP edge sensor and the Pi 5 hosted the vulnerable Docker targets. The architecture was redesigned in Phase 5, which introduced a ThinkCentre M920x running Proxmox with an Active Directory lab as the client infrastructure, and moved the edge-sensor role onto the Pi 5. The detection logic, custom rules, and gap analysis described here remain valid; only the host topology has changed.
Build carried out on real hardware in a controlled home lab. Claude (Anthropic) was used as a reasoning and writing assistant — all deployments, attacks, configurations, and verifications were performed by the author.
Overview
With the detection and triage pipeline live from Phase 1, Phase 2 adds active threat intelligence collection. Cowrie is an SSH honeypot — it masquerades as a real SSH server, lets attackers brute-force their way in, gives them a fake shell, and logs everything: every credential tried, every command typed, every file they attempt to download.
The attacker thinks they’ve compromised a real machine. Argus has their IP, their wordlist hits, and a complete session transcript forwarded to Wazuh.
Step 2.1 — Move Real SSH to Port 2222 on Pi 3B+
⚠️ Do this before installing Cowrie. Cowrie will take over port 22. If you don’t move SSH first, you’ll lock yourself out.
1
2
3
4
5
6
# On Pi 3B+:
sudo nano /etc/ssh/sshd_config
# Change: Port 22  →  Port 2222

sudo ufw allow 2222/tcp comment 'Real SSH'
sudo systemctl restart sshd
Test the new port from another terminal before closing your current session:
1
2
ssh -p 2222 <user>@192.168.1.20
# Confirm this works before proceeding
Once confirmed:
1
sudo ufw delete allow 22/tcp
Lesson learned: Never close your existing SSH session until the new port is verified working. If you lock yourself out, you’ll need physical console access to the Pi to recover.
SSH from ThinkPad now goes through WireGuard:
1
ssh -p 2222 <user>@10.0.0.2
Step 2.2 — Install Cowrie
1
2
3
4
5
6
7
8
9
10
11
12
13
14
15
16
sudo apt install -y git python3-venv python3-dev libffi-dev libssl-dev

# Create a dedicated user — Cowrie should never run as root
sudo adduser --disabled-password --gecos '' cowrie
sudo su - cowrie

# Clone and install
git clone https://github.com/cowrie/cowrie.git
cd cowrie
python3 -m venv cowrie-env
source cowrie-env/bin/activate
pip install --upgrade pip && pip install -e .

# Copy default config
cp etc/cowrie.cfg.dist etc/cowrie.cfg
nano etc/cowrie.cfg
Key settings in cowrie.cfg:
1
2
3
4
5
6
[ssh]
enabled = true
listen_endpoints = tcp:2223:interface=0.0.0.0

[output_jsonlog]
enabled = true
Cowrie listens on port 2223 internally. Port 22 traffic gets redirected there via iptables in the next step — attackers connect to 22, Cowrie answers.
1
exit  # Back to your regular user
Step 2.3 — Redirect Port 22 to Cowrie
1
2
3
4
5
6
# Redirect incoming port 22 to Cowrie's internal port 2223
sudo iptables -t nat -A PREROUTING -p tcp --dport 22 -j REDIRECT --to-port 2223

# Make persistent across reboots
sudo apt install -y iptables-persistent
sudo netfilter-persistent save
Verify the redirect is active:
1
2
sudo iptables -t nat -L PREROUTING -n -v
# Should show: tcp dpt:22 redir ports 2223
Step 2.4 — Cowrie Systemd Service
Running Cowrie as a systemd service ensures it starts on boot and restarts automatically if it crashes:
1
sudo nano /etc/systemd/system/cowrie.service
1
2
3
4
5
6
7
8
9
10
11
12
13
[Unit]
Description=Cowrie SSH Honeypot
After=network.target

[Service]
Type=simple
User=cowrie
WorkingDirectory=/home/cowrie/cowrie
ExecStart=/home/cowrie/cowrie/cowrie-env/bin/twistd -n cowrie
Restart=always

[Install]
WantedBy=multi-user.target
1
2
3
4
sudo systemctl daemon-reload
sudo systemctl enable cowrie
sudo systemctl start cowrie
sudo systemctl status cowrie
Verify Cowrie is listening:
1
2
sudo ss -tlnp | grep 2223
# Should show cowrie listening on 0.0.0.0:2223
Test from the ThinkPad — try an SSH connection to port 22 on the Pi 3B+:
1
2
3
ssh root@192.168.1.20
# Try any password — you'll get a fake shell
# Cowrie will log the attempt
Step 2.5 — Forward Cowrie Logs to Wazuh
Wazuh needs read access to Cowrie’s JSON log file. The log lives in the cowrie user’s home directory, so permissions need to be set carefully:
1
2
3
4
5
6
7
8
9
10
# Fix permissions so Wazuh agent can read Cowrie logs
sudo chmod 750 /home/cowrie
sudo chmod 750 /home/cowrie/cowrie
sudo chmod 750 /home/cowrie/cowrie/var
sudo chmod 750 /home/cowrie/cowrie/var/log
sudo chmod 750 /home/cowrie/cowrie/var/log/cowrie
sudo chmod 640 /home/cowrie/cowrie/var/log/cowrie/cowrie.json

# Add wazuh user to cowrie group
sudo usermod -a -G cowrie wazuh
Add Cowrie to the Wazuh Agent config on Pi 3B+:
1
sudo nano /var/ossec/etc/ossec.conf
Add inside <ossec_config>:
1
2
3
4
<localfile>
  <log_format>json</log_format>
  <location>/home/cowrie/cowrie/var/log/cowrie/cowrie.json</location>
</localfile>
1
sudo systemctl restart wazuh-agent
Verify Wazuh is reading the file:
1
2
sudo tail -f /var/ossec/logs/ossec.log | grep cowrie
# Should show the file being monitored
Step 2.6 — Custom Wazuh Rules for Cowrie
By default Wazuh doesn’t know how to parse Cowrie’s JSON format. Add a custom decoder and rules on the Hetzner VPS:
1
2
# On Hetzner — add decoder
sudo nano /var/ossec/etc/decoders/local_decoder.xml
1
2
3
4
5
6
7
8
9
10
<!-- Cowrie SSH Honeypot Decoders -->
<decoder name="cowrie">
  <prematch>{"eventid":"cowrie.</prematch>
</decoder>

<decoder name="cowrie-login">
  <parent>cowrie</parent>
  <regex>"eventid":"(cowrie\.\S+)".*"src_ip":"(\S+)".*"username":"(\S+)"</regex>
  <order>eventid, srcip, username</order>
</decoder>
1
2
# Add rules
sudo nano /var/ossec/etc/rules/local_rules.xml
1
2
3
4
5
6
7
8
9
10
11
12
13
14
15
16
17
18
19
20
21
22
23
24
25
26
27
28
29
30
31
32
33
34
<group name="local,">

  <!-- Suppress SPAN interface promiscuous mode noise -->
  <rule id="100002" level="0">
    <if_sid>5104</if_sid>
    <match>promiscuous</match>
    <description>Suppress SPAN interface promiscuous mode alerts</description>
  </rule>

  <!-- Cowrie: new connection -->
  <rule id="100010" level="6">
    <decoded_as>cowrie</decoded_as>
    <match>cowrie.session.connect</match>
    <description>Cowrie: New honeypot connection from $(srcip)</description>
    <mitre><id>T1110</id></mitre>
  </rule>

  <!-- Cowrie: successful login -->
  <rule id="100011" level="10">
    <decoded_as>cowrie</decoded_as>
    <match>cowrie.login.success</match>
    <description>Cowrie: Attacker logged into honeypot — $(username) from $(srcip)</description>
    <mitre><id>T1110.001</id></mitre>
  </rule>

  <!-- Cowrie: command executed -->
  <rule id="100012" level="6">
    <decoded_as>cowrie</decoded_as>
    <match>cowrie.command.input</match>
    <description>Cowrie: Attacker command executed on honeypot</description>
    <mitre><id>T1059</id></mitre>
  </rule>

</group>
1
2
sudo systemctl restart wazuh-manager
sudo systemctl status wazuh-manager
Verification
From the ThinkPad, trigger a honeypot login:
1
2
3
ssh root@192.168.1.20
# When prompted for password, enter: password123
# Cowrie accepts this and drops you into a fake shell
Check Cowrie’s log:
1
sudo cat /home/cowrie/cowrie/var/log/cowrie/cowrie.json | tail -5 | python3 -m json.tool
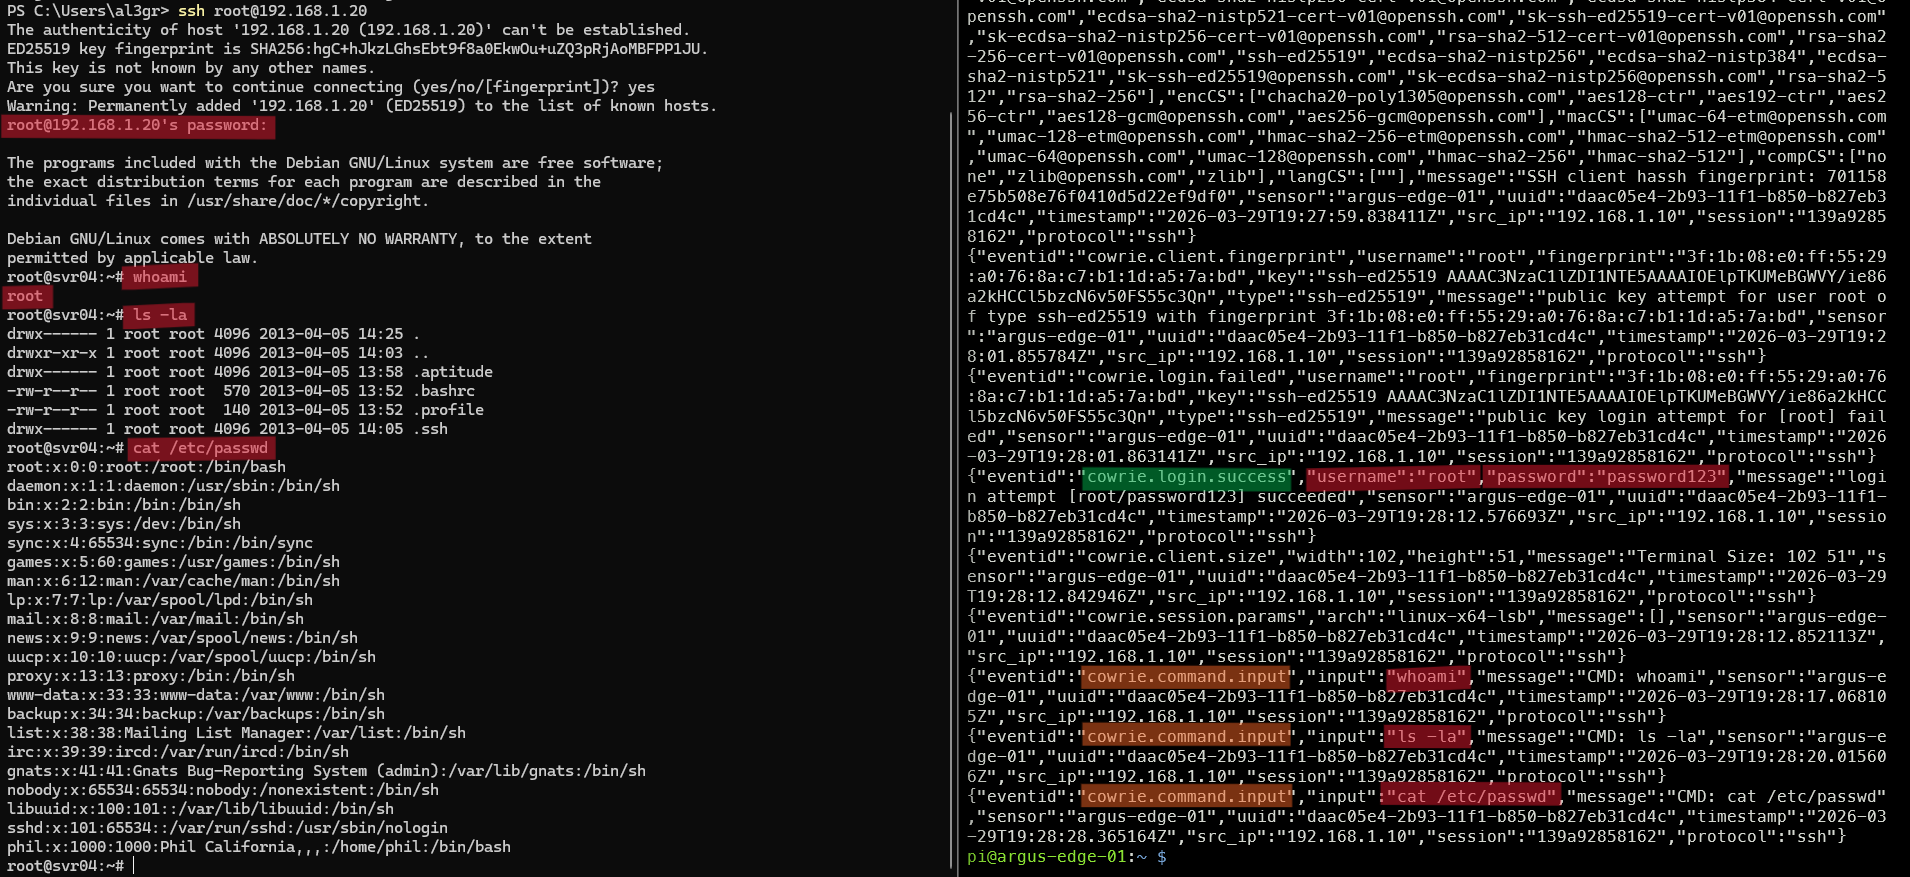 Cowrie session transcript — attacker commands captured in full: whoami, ls -la, cat /etc/passwd
You should see a cowrie.login.success event with source IP and the credential root/password123 logged. Cowrie accepted the login and recorded the full fake shell session.
Check the Wazuh Dashboard — rule 100011 should fire for any successful honeypot login and trigger the Phase 1 triage pipeline, delivering a Telegram alert with MITRE technique T1110.001 (Brute Force: Password Guessing).
 Wazuh Dashboard — rule 100010, 100011 and 100012 firing on successful honeypot login
What Cowrie Captures
Once exposed to the internet (or reachable from the attack range), Cowrie produces real threat intelligence:
- Every credential pair attempted — reveals what wordlists attackers are using
- Every command typed — reveals attacker objectives post-compromise (recon, persistence, lateral movement)
- Every file download attempted — reveals malware staging infrastructure and C2 URLs
- Session duration and behaviour — distinguishes automated bots from human operators
This data feeds into Wazuh for correlation, into the Phase 1 AI triage pipeline for classification, and eventually into the monthly incident report generated in Phase 5.
Current State
| Component | Location | Status |
|---|---|---|
| Wazuh Manager + Indexer + Dashboard | Hetzner VPS | ✅ |
| Wazuh Agent | Pi 3B+ | ✅ Active |
| Suricata NIDS | Pi 3B+ (eth1 SPAN) | ✅ |
| Zeek | Pi 3B+ (eth1 SPAN) | ✅ |
| n8n + Claude API triage | Hetzner VPS | ✅ |
| Telegram + PagerDuty | — | ✅ |
| Cowrie SSH Honeypot | Pi 3B+ (port 22) | ✅ |
| Velociraptor DFIR | — | ⏳ Phase 3 |
| Grafana SOC Dashboard | — | ⏳ Phase 3 |
What’s Next — Phase 3
Phase 3 adds the final two components of the live stack before red team scenarios begin:
- Velociraptor — live endpoint forensics. Server on Hetzner, agent on Pi 3B+. Enables VQL hunting queries and forensic artifact collection during incident response
- Grafana SOC Dashboard — on Pi 5, connected to the Wazuh Indexer on Hetzner. KPI stats, alert timeline, MITRE ATT&CK coverage, top attack sources, and a global threat origin geomap — all built from real data flowing through the pipeline
Part of the Argus SOC build series.